Carob Molasses and Pistachio Ice Cream Sandwiches

When I originally planned this post, it was warm and sunny, the last few official days of summer were quickly approaching, and nothing sounded more on brand than ice cream sandwiches. But Hurricane Dorian changed all of that. Since I live within the cone of uncertainty (which couldn’t be more aptly named right about now), my week has been turned upside down. My Labor Day plans were thwarted and replaced with hurricane preparation (kind of), watching too much Netflix, listening to weathermen use the term “squall” far too often for my taste, and trying to simultaneously motivate myself to work out while refraining from eating all of our hurricane snacks. Turns out, ice cream sandwiches are pretty on brand for the days leading up to hurricanes too. In all seriousness, hurricanes can be very scary and damaging and I am very thankful that I live in a structurally sound home and have the ability to purchase any necessary safety precautions. There are many people, especially on the islands in the Caribbean, who have been devastated by these storms in recent years.

But back to ice cream sandwiches. I am pretty particular when it comes to frozen treats and those store-bought, paper-wrapped sandwiches always do the trick for me. I have tried many times to trade my boxed sandwiches for more refined, homemade ones, stacked together with all sorts of cookies, but I am always left a little disappointed. The cookies freeze and are too hard to bite into, or the ice cream slides right out from between the sandwiches. These, though, are a game changer. The “cookie” layer is much closer to a cake-y brownie, so they are soft enough to bite into and spongey enough to soak in just enough ice cream to keep the whole thing from falling apart.

When I was at the restaurant this summer, I had the opportunity to meet Chef Alon Shaya. He has long been one of my favorites, his book is exceptionally written and his restaurant is the author of some of my most memorable food experiences. Turns out, he is also very kind and a great teacher in real life too. For his final dinner at the restaurant, we made a carob molasses cake, that tasted a lot like a giant brownie, and served it with pistachio gelato, garden peaches, and crushed pistachios tossed with urfa chili flakes. It was really simple, but delicious and I started dreaming of these ice cream sandwiches.

Carob molasses is made by soaking carob pods in water and then cooking it down until you are left with a syrup. It is a Middle Eastern food, rich in history, and it was originally used as an alternative to sugar. Though sweet, it is not as cloyingly sweet as the traditional molasses we are used to here in the U.S. and it has a round, chocolatey flavor. Because it is an invert sugar, when added to baked goods, it also brings a little extra moisture. You can find carob molasses on Amazon, but I encourage you to go check out your local Middle Eastern market if you have time. I love browsing the aisles of my local market and I always walk out with my arms full of new things to try. (If you are in the Orlando area, I like Alexandria Market off of Hanging Moss Road or Shiraz Market in Longwood.)

ICSandwich9.jpg

Carob Molasses and Pistachio Ice Cream Sandwiches

Yield: 6 3”x3” sandwiches

Ingredients: 

170 g (1 1/2 sticks) unsalted butter, melted and slightly cooled

128 g (1 cup) all purpose flour

75 g (3/4 cup) sifted cocoa powder

3/4 tsp baking powder

3/4 tsp salt 

200 g (1 cup) sugar

2 eggs

1 T vanilla extract 

135 g (1/2 cup) carob molasses

1 quart pistachio gelato 

Optional: 

1/4 cup chopped pistachios, 1/4 tsp black pepper, 1/2 tsp ground cardamom, 1/4 tsp ground coriander, sprinkle of flaky salt

Procedure: 

  1. Preheat oven to 350 F. Line a 12x17 rimmed baking sheet with parchment paper and spray generously with cooking spray.

  2. In a small saucepan set over low-medium heat, melt butter and set aside to cool slightly.

  3. In a medium bowl, whisk together flour, cocoa powder, salt, and baking powder. Set aside.

  4. In the bowl of a stand mixer fitted with a whisk attachment, combine melted butter, sugar, and molasses. Whip until smooth and then add eggs, one at a time. Add vanilla and mix until combined.

  5. With the mixer on low speed, add the flour/cocoa mixture and mix until just combined. Remove from stand mixer and fold gently with a rubber spatula until no dry spots remain.

  6. Pour batter onto the prepared pan and use a small offset spatula to smooth into a thin, even layer, leaving about 1/4” of space around the edges.

  7. Bake for 8-12 minutes, until set and then let cool completely. If you aren’t assembling right away, you can keep the cake in the refrigerator until you are ready to build your ice cream sandwiches.

  8. When you are ready to assemble, remove ice cream from the freezer and let stand for a few minutes to soften slightly.

  9. To assemble, trim the edges of your cake until you have a rectangle measuring 12”x16”. Cut the cake in half lengthwise so you have two equal rectangles measuring 12”x8”. Scoop ice cream evenly over one side of the rectangle and use an offset spatula to smooth. Place the other side of the rectangle on top and press down gently. Freeze for at least 6 hours, overnight if possible.

  10. When reading to slice, use a hot knife to trim the edges of the rectangle. Use a ruler to measure 3”x3” squares, slice, and return to freezer. When sandwiches are completely firm, wrap twice in plastic wrap and store in freezer until ready to enjoy.


*Notes:

*Unfortunately for me, I don’t yet have my own ice cream machine so I used Talenti Sicilian Pistachio Gelato. If you have an ice cream maker and want to make your own pistachio gelato, David Lebovitz has a great recipe you can find here

*As I said above, you can find carob molasses on Amazon or at your local Middle Eastern Market. 

Dark Chocolate Coconut Cookies

Yesterday, I finished my last practical of pastry school. After countless batches of mousse and enough meringue making to last a lifetime, I’ve finally reached the end of the classroom. This semester, in my contemporary cakes class, we’ve focused completely on entremets- fancy little cakes, layered with mousse, cremeux, sponges, japonaise, and enough other components to make your head spin. They are usually glazed to perfection and decorated using contemporary designs and clean lines. I’ve enjoyed the opportunity to stretch my technical muscles and figure out how to put my stamp on the style and I will be sharing a rendition of my final exam entremet on the blog soon. But for now, as my semester and time in pastry school comes full circle I’ve been craving simplicity in my home kitchen. We’re going back to the basics today and I am sharing with you one of my signature, no-fail, last minute cookie recipes.

I developed this recipe back in college for my now-husband. It was 2011 and the height of the Levain Bakery cookie craze and I was all in. Despite having never been to NYC or had a Levain cookie of my own, I watched enough Food Network specials to know all about those extra-dense, soft and gooey on the inside, just crispy enough outside balls of dough to fall in love. They had all of my favorite cookie aspects (thin, crispy cookies have no place in my heart) and so I began browsing the internet in search of a copycat. I found a dark chocolate cookie recipe and began playing with it until I struck cookie gold. My husband’s birthday was coming up and I decided to make a special batch with coconut for him (it’s one of his favorite flavors) and these cookies were born. Funny enough, we celebrated his birthday last week and I made these cookies. A lot of things change in 8 years, but good cookies last a lifetime.

P.S. The cookies in the picture are scooped using a smaller cookie scoop. I DO NOT recommend doing this. I was making them for a larger group that needed smaller cookies, but the fudgey consistency of these cookies really begs for the giant cookie scoop. Do yourself a favor and indulge in the big boys.

P.P.S I have still never been to NYC to experience the Levain cookie, however, a few years ago, my husband was in the city for a work trip and he spent his only 2 hours of free time on a subway ride, a 10 block walk, and a 45+ minute line so that he could bring cookies home to me. I’m telling you, the man is a gem. Also, next day Levain cookies aren’t too shabby.

Dark Chocolate Coconut Cookies 

Yield: 18 large cookies 

Ingredients: 

1 cup butter, cold and cubed 

1/2 cup sugar

3/4 cup + 2 tbsp brown sugar

2 eggs 

1/2 cup dark cocoa powder

1 tsp vanilla 

2 1/4 cup flour 

1/4 tsp salt

1 tsp baking powder

2 1/2 cup dark chocolate, chopped 

7 oz shredded coconut 

Procedure: 

  1. In a medium bowl, whisk together flour, salt, baking powder, and coconut. 

  2. In a stand mixer fitted with the paddle attachment, beat butter, sugar, and brown sugar on medium speed until completely combined, fluffy, and lightened in color. Add eggs one at a time and mix until combined. Scrape down the bottom and sides of the bowl. 

  3. Add cocoa powder and vanilla and mix until combined. Decrease speed to low and gradually add dry ingredients, mixing until just combined and no flour streaks remain. Fold in dark chocolate pieces. 

  4. Use a large cookie scoop (or a 1/4 cup measure) to scoop dough onto a parchment-lined baking sheet. Chill for at least one hour and up to 12. 

  5. When you are ready to bake, preheat the oven to 350 ℉ and bake for 13-17 minutes, until the tops of the cookies are dry. Let cookies cool on tray for 5 minutes and then transfer to a cooling rack. 

Optional Glaze: Combine 2 oz of chocolate and 1 tbsp of coconut oil. Microwave, stirring frequently, until smooth. Drizzle or dunk cookies in glaze and let set. 

Note: You can sub regular cocoa powder for the dark cocoa powder if you have no other options, but having tried the recipe both ways, the dark cocoa powder makes the cookie and shouldn’t be skipped.

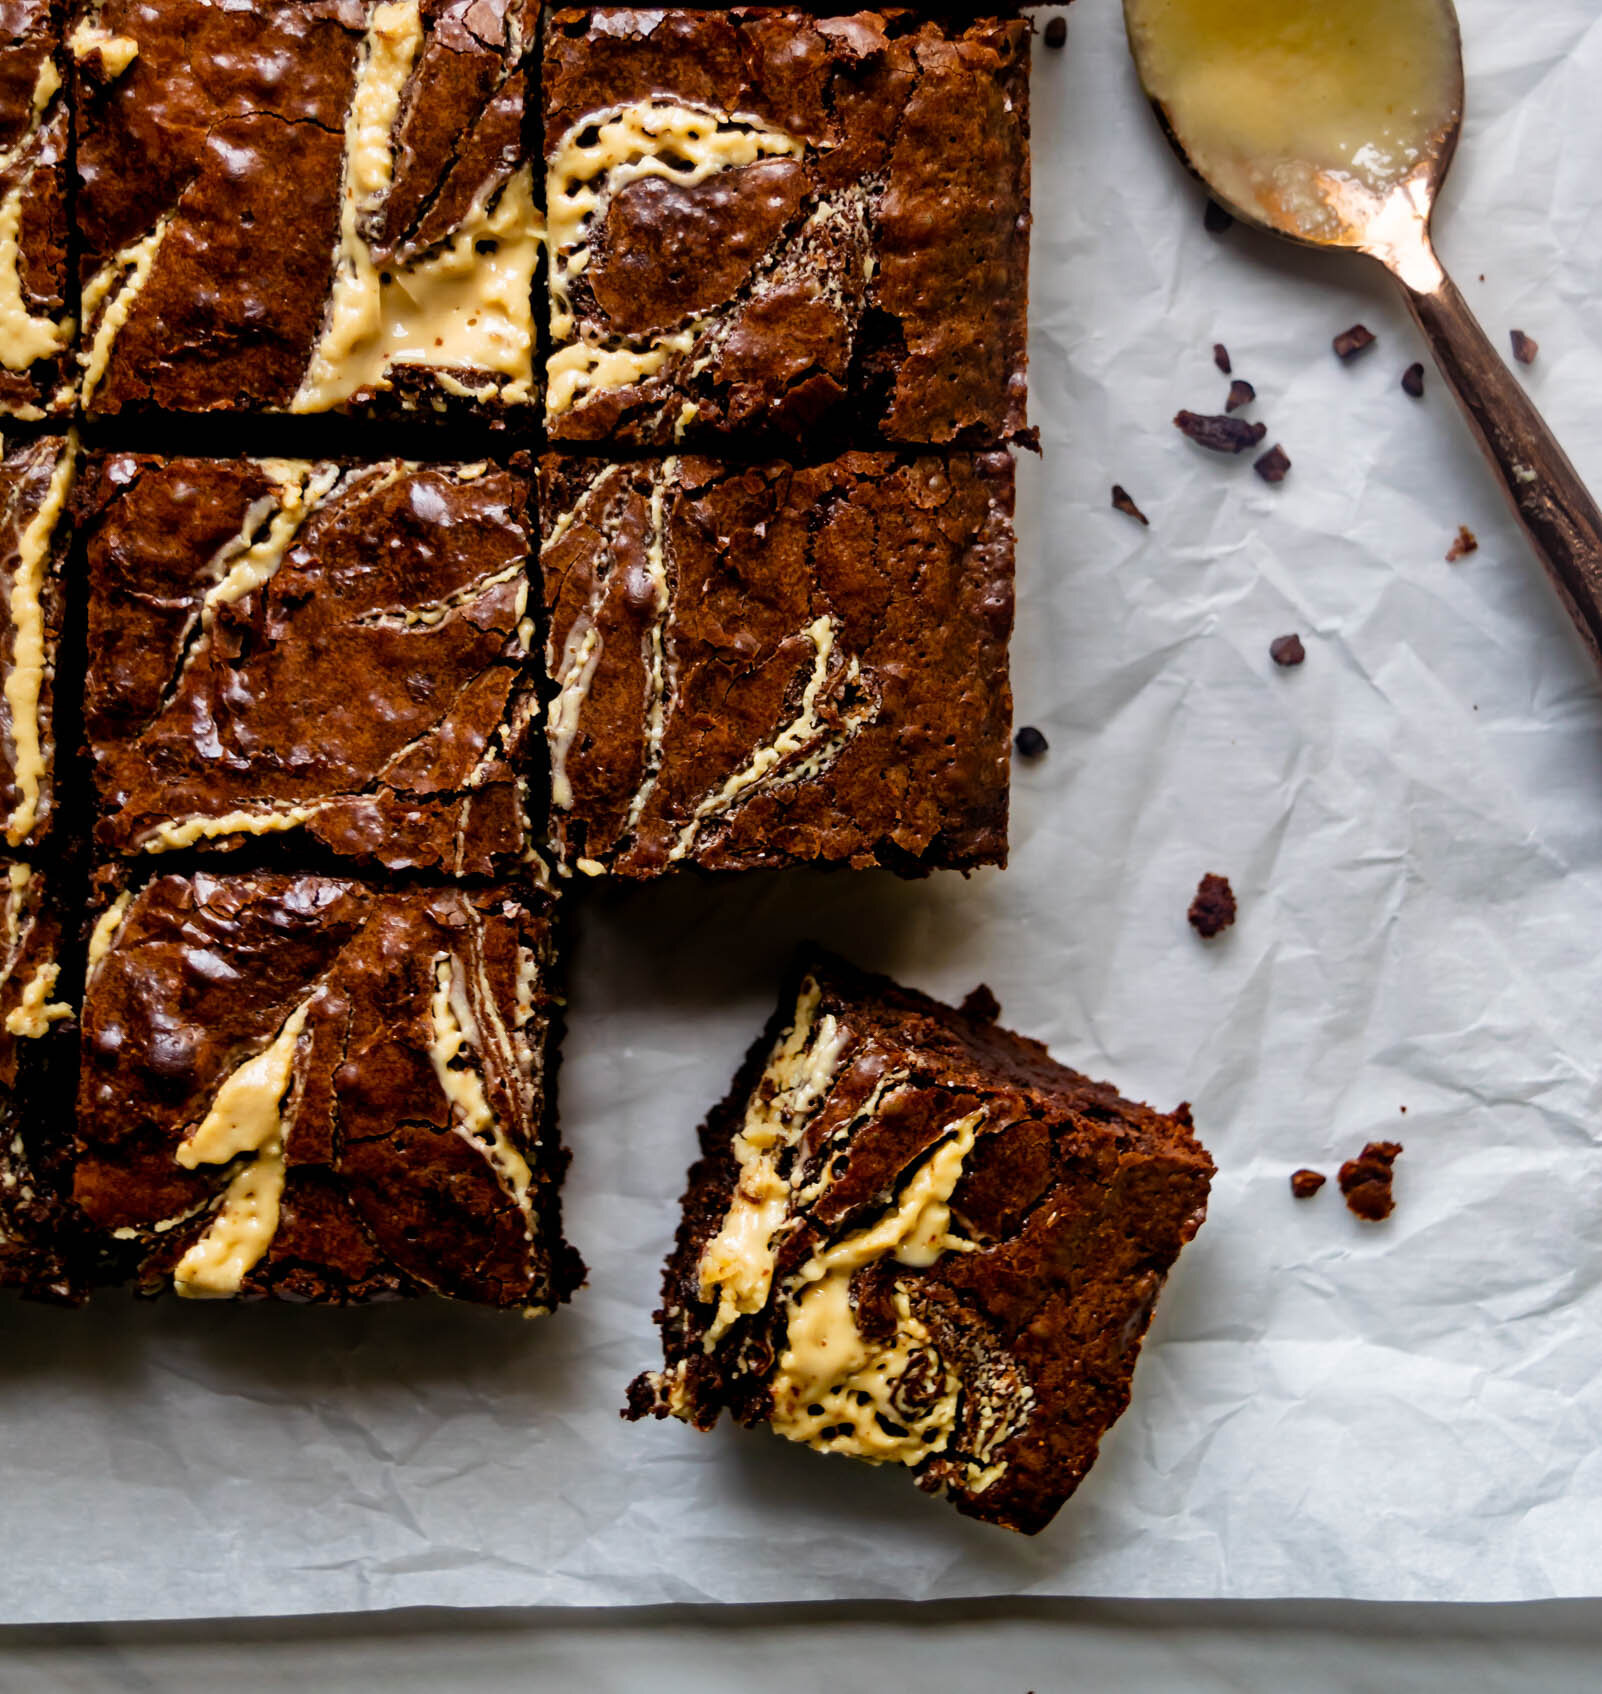
Espresso Tahini Brownies

My favorite fudgy brownie recipe. A thick, chewy chocolate espresso brownie, swirled with nutty tahini because there is nothing better than a good, homemade brownie.

tahinibrowniesnew3.jpeg

Today, we’re getting a little controversial. I know that what I am about to say is not the overall opinion of the masses and I also know that I am getting ready to step into what could be a very heated discussion. Nonetheless, I press on. I am one of those people who never read Harry Potter…until now. Though I was a voracious childhood reader back when the first book was released, my mom wasn’t a big fan and I had little to no interest in fantasy literature so it just wasn’t on my radar. I am smack in the middle of the Harry Potter generation and as I got older, everyone I knew had read ALL of the books, seen ALL of the movies, knew ALL of the backstories, plot twists, etc, etc, and so I just kept quiet about the fact that I never read them. Sometime last year, my husband and one of our friends decided that I was still missing out so we started watching the movies. I made it through one and a half. So now, my book club (which by the way is comprised of my best friends from high school and devout Potter fans) have decided to remedy my situation by reading through the series month by month. For me, it’s been a slow month. It’s not that I don’t enjoy the story or see the draw, I just feel like I missed the boat back in elementary school and have been doing okay without Harry Potter in my life. I will, however, promise to keep an open mind and will report back as we move through the series.

Though it may not be my cup of butter beer (I think that is an appropriate HP reference), I get it. There are some books that draw you in again and again. Books with dog-eared pages and crinkled covers, in which you discover something new every time you pick it up. In my overstuffed shelf of cookbooks, I have one like that. Sweet by Yotam Ottolenghi and Helen Goh is the HP of my cookbook collection. All 363 pages are pure gold and I am drawn to something new each time I flip through. Their approach to dessert challenges me to use new ingredients and introduces me to slightly unorthodox, but always delicious flavors, but Ottolenghi’s writing walks me through each step in such a way that makes me feel like he is in my kitchen with me, folding egg whites into chocolate and chatting about yoghurt. These espresso tahini brownies are my riff on the ones from Sweet. These are my favorite way to make brownies and I now I continually find myself trying to swirl tahini into any baked good I can.

how to make espresso tahini brownies

I am a big fan of thick, fudgy brownies, which means I tend to incorporate a lot of eggs and not a lot of flour in my brownie recipes. For this one, we start with a base of melted dark chocolate, butter, and espresso powder. Sugar and brown sugar are whisked into the warm chocolate, followed by the eggs until everything is smooth and homogenized. A bit of flour and some dark cocoa powder is folded in until just incorporated and then the batter is swirled with dollops of tahini before baking.

tahinibrowniesnew3.jpg
Yield: 16 brownies
Author: Anna Ramiz
Espresso Tahini Brownies

Espresso Tahini Brownies

Prep time: 15 MinCook time: 40 MinTotal time: 55 Min
My favorite fudgy brownie recipe. A thick, chewy chocolate espresso brownie, swirled with nutty tahini because there is nothing better than a good, homemade brownie.

Ingredients

  • 1 cup all purpose flour
  • 1 tsp salt
  • 6 Tbsp dutch process cocoa powder
  • 11 oz dark chocolate, chopped
  • 1 cup (2 sticks) butter, cubed
  • 2 tsp ground espresso
  • 1 cup sugar
  • 1 cup brown sugar
  • 5 eggs
  • 2 tsp vanilla extract
  • 1/4 cup tahini

    Instructions

    1. Grease a 9x13 pan and line with parchment paper. Preheat oven to 350 degrees.
    2. Place chocolate, butter, and espresso in a large, heat proof bowl. In a separate bowl, sift together flour, cocoa powder, and salt. Set aside.
    3. In a medium saucepan, heat sugar, brown sugar and 6 T water (or coffee). Cook over medium heat until syrupy and simmering at the edges. The sugars should be mostly dissolved. Immediately pour the syrup over the chocolate/butter mixture and gently shake the bowl to make sure everything is coated. Let sit for 3-4 minutes. Whisk until everything is combined and smooth.
    4. Add 2 eggs to the chocolate mixture and whisk until combined. Whisk in the remaining 3 eggs and vanilla extract. Sprinkle dry ingredients over the top of the chocolate mixture and use a rubber spatula to fold in gently until no flour streaks remain.
    5. Pour batter into the prepared pan and smooth the top with a spatula.
    6. Dollop tahini evenly over the top of the batter and swirl with a toothpick or a knife.
    7. Bake for 35-40 minutes, rotating the pan halfway through, until a skewer inserted into the center comes out clean.
    Did you make this recipe?
    Tag @gatheredatmytable on instagram and hashtag it #gatheredatmytable